


Drilling The FCI3 Synthetic Hydroxyapatite Implants
(InSIGHT Neswletter Special Edition/ Update)
On February 26, 1997, Health and Welfare Canada approved the Synthetic Hydroxyapatite Implant (manufactured by FCI, France) for general use in Canada.
In 1985, hydroxyapatite as an orbital implant (Bio-Eye® ) was introduced for use in the anophthalmic socket and a new era in anophthalmic reconstruction began. In a recent survey of 5,439 intraorbital implants, hydroxyapatite (Bio-Eye® ) was the implant most commonly used by ophthalmic plastic surgeons in North America [1]. It has several advantages over previously used implants including having a porous structure made of material similar in nature to the mineral component of human bone. As a result, it is recognized by the body as similar. Its extensive pore system permits fibrovascular ingrowth, helping the implant to resist migration, a problem not uncommonly seen with its predecessor, the non-porous polymethylmethacrylate sphere. The hydroxyapatite implant also allows secure attachment of the extraocular muscles which in turn lead to improved orbital implant motility. In addition, the implant can be directly coupled to the prosthesis through a peg system, allowing a wide range of prosthetic movement as well as fine darting eye movements, commonly seen during conversational speech [2,3,4].
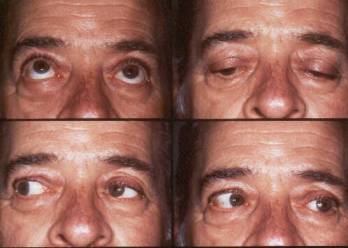
Examples of motility with the FCI3 implant.
TThe 3rd generation Synthetic Hydroxyapatite Implant (FCI3) is a viable alternative to the Bio-Eye® and currently being distributed throughout Canada, Europe and several parts of the world. It is chemically identical to the Bio-Eye® , shows equally good vascularization (in a rabbit model), is easy to work with and well tolerated by human patients [5,6]. The major advantage of this implant include; 1) less costly, 2) easier to drill (as a motorized drill is not required) and 3) environmentally conservative (as marine ecosystems are not affected by its production).
The Drilling Technique
Pegging of the synthetic hydroxyapatite implant is done once complete vascularization takes place. This generally occurs in 4 to 6 months. To confirm vascularization, an MRI scan can be done. This is essential in patients with chronic disease such as Diabetes, collagen vascular disease or, in sockets having previous radiation, where vascularization of the implant may take a prolonged time (6 to 12 months or longer). In these types of patients, the author usually waits a year before considering the peg and confirms vascularization with an MRI scan.
The Synthetic hydroxyapatite can be drilled by a simple manual technique. Some of the patients can be done in a minor room under local infiltrative anesthesia whereas others may require local standby anesthesia with the use of intravenous medications in addition to the local infiltrative anesthesia to settle their anxiety. Prior to drilling, the patient is sat up and asked to look into the 3, 6, 9 and 12 o’clock quadrants. The conjunctiva over the center of the implant is marked with a gentian violet marker. Alternatively, a conformer with a central hole can be made (by the ocularist preoperatively) to identify the ideal drill hole position. The patient is then placed in the supine position. Topical anesthetic drops (such as alcaine, proprocaine, tetracaine, etc.) are placed on the conjunctival surface in addition to a couple of drops of 2.5% topical epinephrine (Mydrin® ) to vasoconstrict the conjunctival vessels. Next, approximately 2 to 3 cc of 2% lidocaine in combination with epinephrine is infiltrated into the skin of the central lower lid, central upper lid and lateral canthus to anesthetize the orbicularis muscle. Following a few minutes of pressure, a 25 gauge, inch and a half needle is used to infiltrate a small amount (1/4 cc) of local anesthesia at the 3, 6, 9 and 12 o’clock conjunctival positions. The needle tip is pointed into the fornix in each of these positions and is about 5 mm away from the center of the implant (gentian violet mark). After waiting 5 minutes with light pressure being applied, the central conjunctiva is incised for 5 mm with Westcott scissors and sharp dissection is carried out to the implant surface. Any minor bleeding vessels are cauterized with bipolar cautery. A 25 gauge needle is held between the thumb and index finger and placed onto the implant center. With a light twisting downward movement between the thumb and index finger, the needle enters the implant. Once the needle is into the implant by 10 to 12 mm, the needle is released. The needle is viewed to see if it is centrally placed, and the patient is asked to look up, down, left and right to see how it is moving. If the needle is not centrally placed and is on an angle, it is removed and realigned by re-entering the needle on a slightly different angle. This process is repeated until the needle is straight while the patient is looking straight. The 25 gauge needle is then replaced with an 18 gauge needle in a similar fashion. The 18 gauge needle enlarges the drill hole. Following this, a drill bit is placed between the thumb and index finger, and, with a downward, back and forth rotating-twisting motion the drill hole is increased in diameter. The hole is rinsed and the appropriate peg system can then be inserted. (Figures 1a,b) If a standard peg is to be used (Figure 1a – arrow) it is simply put into the hole. If a sleeve system is to be used (Figures 1a,b) the sleeve is put in place first. The original polycarbonate sleeve (Figure 1a) requires enlargement of the initial 3 mm hole with a 3.8 mm drill bit. The hydroxyapatite coated titanium sleeve (by FCI) can simply be placed into the 3 mm hole without redrilling. There is also a 3.8 mm hydroxyapatite coated titanium sleeve available. A sleeve is screwed into position and countersunk by 1 mm to the implant surface. A flat headed peg is then placed into the central sleeve hole. Conjunctiva is reapproximated one with two sutures (6-0 plain). In approximately one month the ocularist removes the flat headed peg and inserts one of the round headed pegs. At the same time he makes a corresponding indentation in the posterior surface of the prosthesis to allow coupling of the peg to the implant.
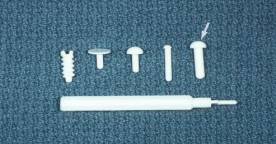
Figure 1a – Original polycarbonate peg (arrow) with sleeve and peg system (to the left).
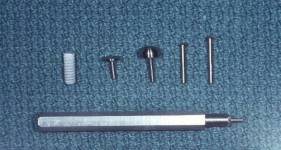
Figure 1b – FCI Hydroxyapatite coated titanium sleeve (left) with titanium pegs.
References
1. Hornblass A, Biesman B, Eviator J. Current techniques of enucleation: a summary of 5,439 intraorbital implants and a review of the literature. Ophthal Plast Reconstr Surg 1995:11(2):77-88).
2. Perry AC. Advances in enucleation. Ophthal Plast Reconstr Surg 1991:4(1):173-182.
3. Byrd WA. Corraline Hydroxyapatite Orbital Implant. Ophthalmic Practice 1991:9:6:262-266.
4. Dutton J. Corralline hydroxyapatite as an ocular implant. Ophthalmology 1991:98:370-377.
5. Sieff SR, Chang Jr. JS, Hunt MH, Khayam-Boshi H. Polymerase chain reaction identification of human deficiency virus-1 in preserved human sclera. Am J Ophthalmol 1994:118:528-36.
6. Jordan DR, Munro S, Brownstein S, Gilberg S, Grahova S. A synthetic hydroxyapatite implant: the so-called counterfeit implant. In press – Ophthal Plast Reconstr Surg.
7. Jordan DR, Gilberg S, Mawn L, Brownstein S.: The synthetic hydroxyapatite implant: a report on 65 patients. In press – Ophthal Plast Reconstr Surg.
If you have any questions regarding the topics of this newsletter, or requests for future topics of InSight, please contact Dr. David R. Jordan office by telephone at (613) 563-3800.