


Tips for pegging hydroxyapatite implants
(Bio-Eye® and FCI3 HA)
The hydroxyapatite (HA) implants (Bio-Eye® or FCI3 HA implant) can be directly coupled to the artificial eye through a peg system, allowing a wide range of prosthetic movement as well as darting eye movements commonly seen during conversational speech. Pegging is done once complete vascularization takes place. This generally occurs by 6 months in most individuals. To confirm vascularization, a Magnetic Resonance Imaging (MRI) scan can be done. This is essential in patients with chronic disease such as diabetes, collagen vascular disease or in sockets having previous radiation, where vascularization of the implant may take a prolonged time (6 to 12 months or longer). In these types of patients, the author waits a year before considering the peg and confirms vascularizartion with a MRI scan.
The commonest peg systems available to date are made of polycarbonate (plastic) and involves a “standard peg” or a “peg and sleeve” system (Figure 1a), (Kolberg Ocular Products Inc., 9663 Tierra Grande St., Suite 201, San Diego, California, 92126, (Tel)619-695-2021, (Fax)619-695-2712). A polymethylmethacrylate peg and sleeve system (Figure 1b) is also available through FCI (20 Boulevard Gallieni – BP111, 92134 Issy-Les-Moulineaux, Cedex, France, (Tel) (0) 1 40 93 06 09, (Fax) (0) 1 40 93 46 87).

Figure 1a – Polycarbonate peg and sleeve system with original peg (white arrow) and, peg and sleeve system (left of standard peg) illustrated.
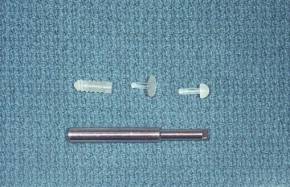
Figure 1b – Polymethylmethacrylate peg and sleeve system illustrated.
Originally, a “standard peg” (on its own) was the suggested peg to use in the Bio-Eye® hydroxyapatite implant after making a 3.0mm diameter drill hole with a power drill. To improve motility (by getting a tighter couple), decrease spontaneous peg dislodgment, and perhaps offer better prosthesis support, a “peg and sleeve system” was advocated. The sleeve is screwed into a 3.8mm drill hole (made with a power drill) and the peg fits within the shaft of the sleeve (Figure 1a). Recently titanium peg systems have become available from the distributors of the Bio-Eye® and the FCI3 synthetic HA. Titanium has been used in facial reconstruction, as a dental implant, as well as many other areas for years. It is felt to be more biocompatible and better tolerated by the human tissues than other materials[1]. The FCI system involves a titanium sleeve (3.0 or 3.8 mm size available) with a hydroxyapatite coating so that when it is inserted into the HA sphere, complete material compatibility takes place (hydroxyapatite sitting against hydroxyapatite) (Figure 2). The hydroxyapatite coating will allow host fibroblasts to gain a foot hold to secure themselves to (bioactive) (Figure 3). A titanium peg fits into the sleeve. Dr. Perry’s new P-K™ titanium motility/support peg system involves a titanium sleeve system and a peg as well, but without a hydroxyapatite coating (Figure 4). Once in position the titanium sleeve sits directly against the hydroxyapatite. The titanium on its own is very well tolerated by human tissues without any tissue reaction to it (bioinert). Fibroblasts and other host tissue live beside it but do not obtain a foot hold as is the case with the hydroxyapatite coated titanium sleeves produced by FCI. The hydroxyapatite coating allows a stronger attachment to the surrounding tissue then titanium on its own[1].
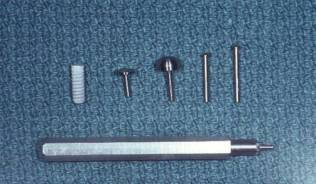
Figure 2 (above) – FCI hydroxyapatite coated titanium sleeve with corresponding titanium pegs illustrated.
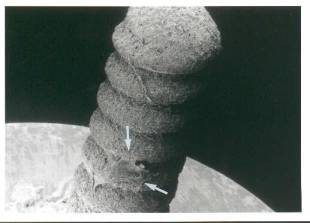
Figure 3 (above) – Fibroblast (arrows) attached to the hydroxyapatite coated titanium sleeve.
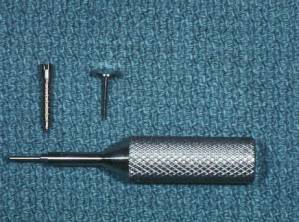
Figure 4 (above) – Dr. Perry’s P-K™ titanium motility/support peg system.
The choice of which peg systems to use is up to the individual surgeon. Both titanium systems (in this author’s opinion) are better tolerated than the polycarbonate or polymethalmethacrylate system. Recent studies (by DRJ) confirm a decrease in discharge associated with the FCI titanium system[2].
The purpose of this article is to highlight various points that are important to consider when inserting the various peg systems.
The position on the hydroxyapatite implant to drill (pilot hole) is either located immediately pre-operatively by watching the socket movement prior to injecting local, or with a conformer (made by the ocularist) that has been made prior to drilling with a central hole in it. Originally, a power dill was required for drilling the Bio-Eye (supplied through Integrated Orbital Implant Inc., 12526 High Bluff Drive, Suite 300, San Diego, CA 42130-2067). A 3.0mm hole was drilled to approximately 10mm and the standard peg was put in. With the introduction of the polycarbonate peg and sleeve system, a 3.8mm hole was required. The sleeve is screwed into this slightly larger hole, a peg is then placed into the sleeve. An implant ring stabilizer can be used to help hold the implant stable during the drilling procedure (available through Integrated Orbital Implant Inc.). Generally, this procedure can be done in a “minor procedure room” with local anesthesia into the lid and retro- bulbar space. In a nervous or anxious individual, intravenous sedation is required and, in our institution, is administered by an anesthesiologist while the patient is being monitored. The FCI3 synthetic HA are much easier to drill than the Bio-Eye® and a power drill is not required [3]. In most individuals all that is required is local anesthetic into the upper and lower lids (1 to 2cc lidocaine in combination with epinephine total) followed by a small amount of local anesthesia subconjunctivally at the 3, 6, 9 and 12 o’clock positions (¼cc at each location). Rarely, in the very nervous individual retrobulbar anesthesia is needed and occasionally intravenous sedation is required. A simple manual drilling technique carried out using a hand held drill bit (supplied with the FCI peg kit) is used to make a 3.0mm drill hole to approximately 10mm in depth. A pilot hole is made first with a 25 gauge needle. If the needle placement has proper alignment, the hole is enlarged with an 18 gauge needle followed by the 3.0mm hand held drill bit. If the initial 25 gauge needle does not have proper alignment it can be easily withdrawn and redirected so that the proper alignment is obtained. A 3.0mm HA coated titanium sleeve is then screwed into position. In most patients retrobulbar anesthesia is not needed. The technique to make a hole is easy to do and requires little pressure applied to the orbital implant and orbital tissues. It is this orbital pressure that generally creates patient discomfort.
With Dr. Perry’s new P-K™ titanium peg system he suggests that power drilling is no longer required for the Bio-Eye® pegging technique (from Dr. Perry’s web site – http://www.ioi.com/news/tipeyad.html and personal communication). The suggested technique is done with a large volume retrobulbar anesthesia (5-7cc) as a sterile procedure. A template (made by the ocularist) is made with a central hole to mark the ideal drilling spot. A 20 gauge needle is used to make an initial hole into the Bio-Eye slowly and carefully, ensuring that it is straight. Dr. Perry advocates pushing the needle completely through the implant to allow more vascular ingrowth. The original hole is enlarged using an 18g, 16, and 14 gauge needle. The hole is then irrigated with gentamycin (40mg/cc) and the threaded titanium sleeve easily screws into the hole. The opened end of the sleeve is screwed in until it is 2-3mm below the conjuctiva to account for edema (from product monograph of P-K™ titanium peg system). A flat headed peg is put in along with antibiotic ointment and the artificial eye which has been soaking in Betadine. The patient is placed on oral antibiotics for 7 days and will see the ocularist in 1 month for placement of a round headed peg.
In this author’s experience the Bio-Eye® can be very hard at times, and as a result may be difficult to drill by hand using the needle technique described. The more pressure required to push the initial 20 gauge needle into the Bio-Eye®, the more likely the patient is to feel discomfort. These individuals definitely require retrobulbar anesthesia and may require either additional retrobulbar or intravenous sedation as the procedure proceeds. It is for this reason that I routinely have a power drill ready to use if required. In addition when drilling the Bio-Eye® I routinely use an out-patient procedure setting with an anesthesiologist present, administering intravenous sedation to keep the patient comfortable. This is one of the major advantages of the FCI3 HA implant over the Bio-Eye®. The FCI HA is easy to drill by hand. Less pressure has to be applied to the needles and drill bit, and as a result less local is required. In fact, for most patients no intravenous sedation is required and no retrobulbar is required when using the FCI HA implant. The other advantage of avoiding a retrobulbar anesthetic is that you are more readily able to assess whether the needle alignment is correct or not. Without a retrobulbar the patient can look up, down, left and right, helping you to assess whether the needle is straight or on an angle. With a retrobulbar anesthetic in place, the ocular motility is affected and you may not be able ckeck the implant excursions. In addition, with a retrobulbar anesthetic it is possible to shift the orientation of the orbital implant. You may think you have the proper orientation of the needle and subsequent peg but as the retrobulbar wears off and orbital implant shifts back to its original position, you may be surprised to see the peg has been drilled on an angle. This problem does not exist if the retrobulbar anesthetic is not in place.
he 3.0mm or 3.8mm HA coated titanium sleeve produced by FCI can be implanted into the Bio-Eye®. To do this one can use the manual drilling technique suggested by Dr. Perry above with some minor modifications. Once the pilot hole is located, I incise conjunctiva centrally for 5 millimeters and dissect down to the surface of the HA implant. A 20 gauge needle is used to make the initial hole into the HA implant followed by gradually increasing needle sizes to a 14 gauge size under retrobulbar anesthesia. Once a 14 gauge needle drill hole has been made, the hand held drill bit supplied in the FCI titanium peg kit can be used to enlarge the hole to a 3.0mm size. The hole is irrigated with gentamicin 40mg/cc. The HA coated titanium sleeve can then be screwed in. If it doesn’t go in readily (as the Bio-Eye® is harder to screw into then the FCI3 synthetic HA) the hole is made slightly larger using the hand held drill bit by applying twisting, up and down movements, and exerting pressure to the sides of the drill hole. This manoevre enlarges the hole slightly and will make placement of the FCI 3.0mm HA coated titanium sleeve easier. The drilling technique for the Bio-Eye® is much quicker and easier with a power drill. The problem with a power drill is that usually more pressure has to be applied to the socket. The patients are more nervous, and restless, not only because of this pressure but also because of the noise of the drill. As a result, more local anesthesia (subconjunctival and retrobulbar) and perhaps intravenous sedation is required.
The FCI titanium HA sleeve should be counter sunk to a level even with the HA implant. The flat headed titanium peg is put into place and two to three sutures are used to close conjunctiva. The flat headed peg is exchanged with a round headed peg in 30 days.
One of the other advantages of the FCI HA coated titanium sleeve systems is the following: if the patient has one of the original standard polycarbonate pegs (the one originally suggested for the Bio-Eye®) that is spontaneously falling out, a 3.0 or 3.8mm FCI titanium sleeve can be put into the same drill hole. To do this, a minimal amount of local is required at 3, 6, 9 and 12 o’clock positions (¼ cc 2% lidocane with epinephine) in each spot, with little if any retrobulbar anesthesia (use as required). A small amount of local can be put into the lids to decrease squeezing. The polycarbonate peg is simply removed. The hole is freshened up readily with the FCI hand held drill bit and the 3.0 or 3.8mm FCI titanium sleeve is screwed into position. If the 3.0mm sleeve is not secure, a 3.8mm is used. You can not do this with Dr. Perry’s new P-K™ motility support system as the 3.0mm hole is too large for this new peg.
Similarly, if the patient has a 3.8 polycarbonate peg and sleeve system and you decide to change it over to a titanium system, the 3.8 mm polycarbonate sleeve is unscrewed and removed, and a 3.8mm FCI HA coated titanium sleeve (FCI) can be put in, under minimal local anesthesia at 3, 6, 9 and 12 o’clock positions of the conjunctiva (¼ cc 2% Lidocane with epinephine). You can not do this with one of Dr. Perry’s new P-K™ titanium peg systems as the implant hole is too large in diameter for the peg system.
In summary, the titanium peg and sleeve systems available seem to be better tolerated by the human tissues and in this author’s opinion, more biocompatible than previously used polycarbonate and polymethyl methacrylate peg systems. These peg systems are not always simple to put in, but various tips as outlined in this paper should make pegging easier to do.
References
1. Cook S., Dalton J. Biocompatibility and biofunctionality of implanted materials. Alpha Omegan 85 (4) 41-7, 1992.
2. Jordan D.R., Klapper S. A new peg system for hydroxyapatite implants. (in press).
3. Jordan D.R., Gilberg S., Mawn L., Brownstein S., Grahovac S.Z. The synthetic hydroxyapatite implant : a report on 65 patients. Ophthal Plas Reconstr Surg 14:4:250-255, 1998.
If you have any questions regarding the topics of this newsletter, or requests for future topics of InSight, please contact Dr. David R. Jordan office by telephone at (613) 563-3800.